
วัตถุประสงค์
1.1 ศึกษาและพัฒนาทักษะการสร้างเกม VR ด้วย Unity
- ฝึกกระบวนการออกแบบเกมในรูปแบบ Immersive ที่รองรับอุปกรณ์ VR หลากหลายแพลตฟอร์ม เช่น Meta Quest 2 และ HTC Vive Pro พร้อมทั้งเรียนรู้การจัดการระบบอินพุตที่แตกต่างกัน
1.2 สร้างต้นแบบเกม VR เพื่อการศึกษาและความบันเทิง
- พัฒนาต้นแบบ (Prototype) เกมที่ผสานองค์ความรู้ด้านตำนานเทพปกรณัมกรีกเข้ากับประสบการณ์เสมือนจริง เพื่อพิสูจน์แนวคิดว่าเนื้อหาเชิงวรรณกรรมสามารถประยุกต์สู่สื่อเกมที่น่าสนใจและมีคุณค่าทางการเรียนรู้ได้
1.3 ออกแบบปริศนา (Puzzle Design) ที่ซับซ้อนและมีความเชื่อมโยงกับตำนานกรีก
- พัฒนาเกมเพลย์ที่ใช้กลไกปริศนาเชิงตรรกะ (Logical Puzzles) ร่วมกับการปฏิสัมพันธ์ในโลก VR โดยอ้างอิงจากเนื้อหาทางตำนาน เพื่อส่งเสริมการคิดวิเคราะห์และความเข้าใจเนื้อหาอย่างลึกซึ้งผ่านการเล่น
ภาพรวมของระบบ (System Scenario)
HTC Vive Pro
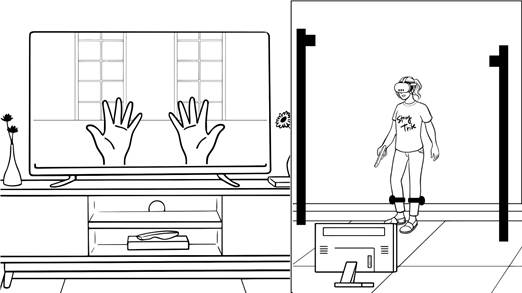
Meta Quest 2
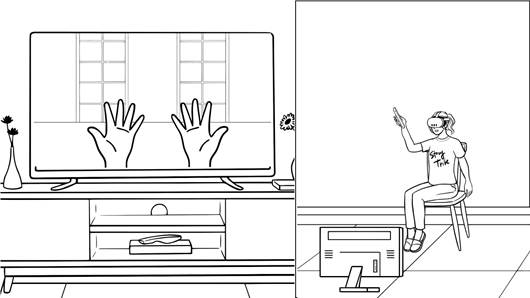
- สวมอุปกรณ์: ใส่แว่น VR (Headset) เพื่อเข้าสู่โลกเสมือนจริง
- ควบคุม: ใช้คอนโทรลเลอร์มือ หรือการขยับมือ/ร่างกาย/เท้า (เช่น Vive Tracker) เพื่อบังคับตัวละครและโต้ตอบในเกม
System Data Flow
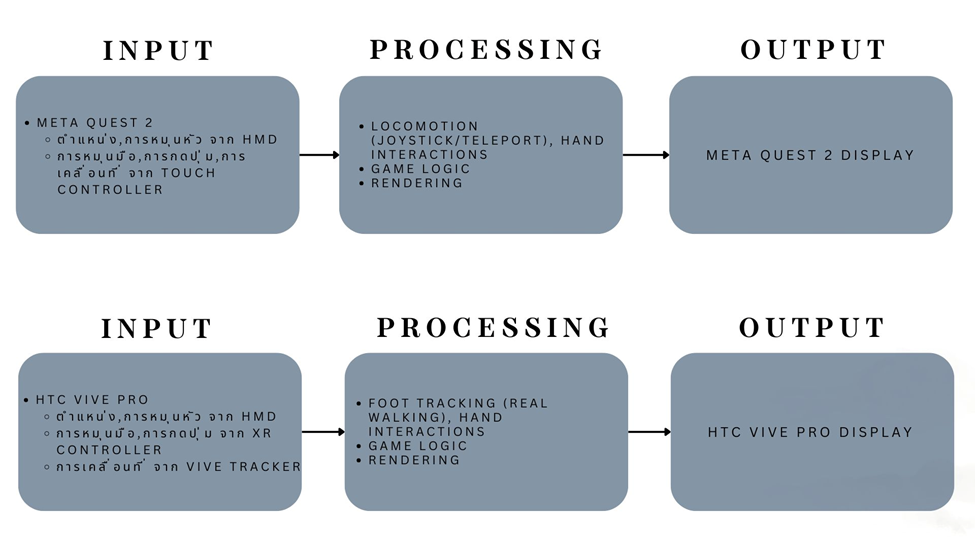
Input (การป้อนข้อมูล)
- Quest 2 (Touch Controller): ผู้เล่นใช้ Touch Controller เพื่อป้อนข้อมูลการเคลื่อนไหวของมือ/หัว, การกดปุ่ม, และการเคลื่อนที่ผ่าน Joystick เข้าสู่เกม
- HTC Vive Pro (Vive Tracker / Controller): ผู้เล่นใช้ Vive Controller และ Vive Tracker ที่เท้าเพื่อป้อนข้อมูลการเคลื่อนไหวของมือ/หัว และ ข้อมูลการย่ำเท้า/ก้าวเดินจริงจาก Vive Tracker
Processing (การประมวลผล)
- Input Processing: ระบบจะแปลงข้อมูล Input ดิบจากอุปกรณ์ VR (ตำแหน่ง, การหมุน, ปุ่มกด, การเคลื่อนไหวเท้า) ให้เป็นคำสั่งที่เกมเข้าใจได้ (เช่น การเคลื่อนที่ของตัวละคร, การกระทำต่างๆ) โดยเฉพาะการแปล การย่ำเท้าให้เป็นการเดิน
- Game Logic: อัปเดตสถานะของตัวละครและวัตถุในโลกเกมตามคำสั่งที่ประมวลผลแล้ว (เช่น การเดิน, การโต้ตอบ, ฟิสิกส์) ข้อมูลสถานะเกมจะถูกเก็บและอัปเดตใน Game State Data
- Rendering: สร้างภาพ 3D และเสียงตามสถานะปัจจุบันของเกม เพื่อเตรียมพร้อมสำหรับการแสดงผลบนจอ VR
Output (ผลลัพธ์)
- Quest 2 Display: แสดงผลภาพและเสียงที่ประมวลผลแล้วบนหน้าจอและลำโพง/หูฟังของ Quest 2 ให้ผู้เล่นได้รับประสบการณ์ VR
- HTC Vive Pro Display: แสดงผลภาพและเสียงที่ประมวลผลแล้วบนหน้าจอและหูฟังของ HTC Vive Pro ให้ผู้เล่นได้รับประสบการณ์ VR
VR Player (XR Interaction Toolkit)
- เริ่มเกม
- Spawn XR Origin (XR Rig)
- โหลด Input Action: XR Controller
- เปิด UI แบบ World Space (Ray Interactable)
- เชื่อมต่อ Multiplayer (NetworkManager / Photon)
- ใช้ XR Controller สำหรับ
- เดิน
- หมุนวัตถุ (Rotate Action)
- จับ / ปล่อยวัตถุ
- เรียกใช้ Script:
- MultiSwapObject.cs → เปลี่ยน Prefab
- CheckRotationAndPosition.cs → ตรวจตำแหน่ง/มุม
- ส่งสถานะไปยัง PuzzleManager
- PuzzleManager ตรวจเงื่อนไขครบ → แสดงผลสำเร็จ
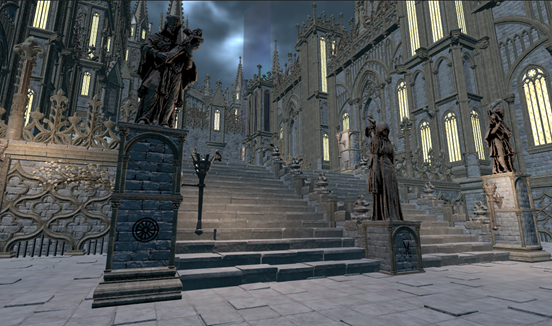
เนื้อหาของเกม
ผู้เล่นจะถูกนำตัวไปที่วิหารของเทพีแห่งราตรี[เทพนิกส์(Nyx)]และต้องทำการไขปริศนาเพื่อหาออกจากที่แห่งนี้
วิธีการเชื่อมต่อและใช้งานอุปกรณ์
Quest
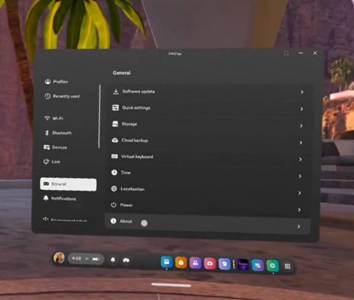
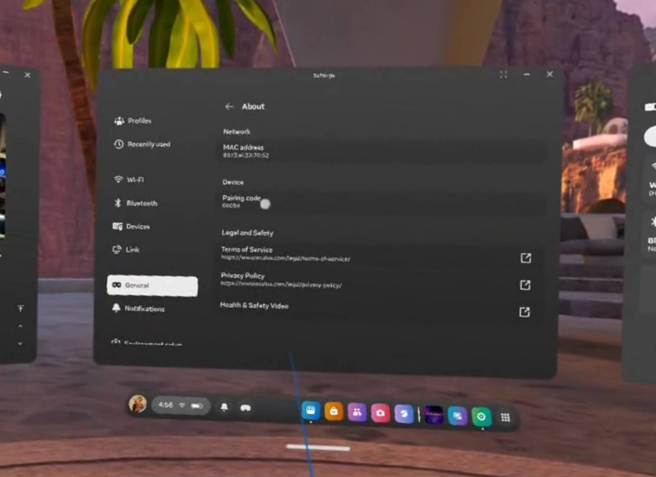
หากยังไม่ได้เชื่อม quest กับ Meta horizon ในโทรศัพท์ ให้ทำการไปที่ Setting → General → About → Device นำเลขตรง Pairing code ไปใส่ในแอพ Meta horizon เพื่อเชื่อมบัญชี Meta กับ quest
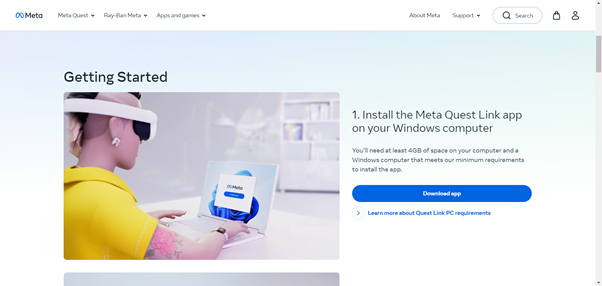
คอมพิวเตอร์
- โหลด Meta Quest Link ลงคอมพิวเตอร์ หรือ โหลดจาก
- ใช้สาย Link เชื่อมต่อระหว่าง quest กับคอมพิวเตอร์
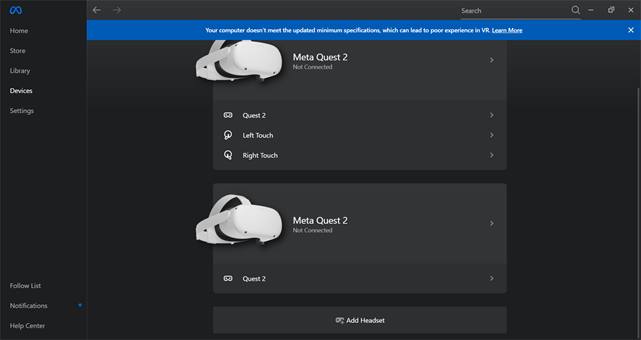
- หากไม่เคยเชื่อมให้ไปที่ Add Headset และ เลือก quest ที่ใช้งาน
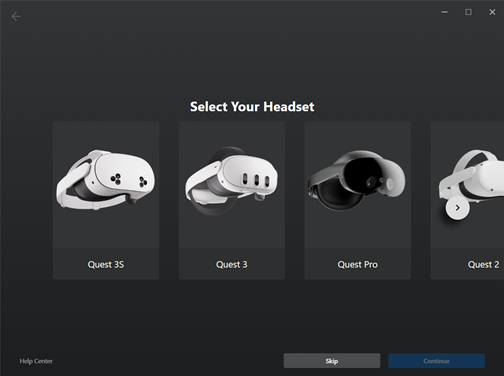
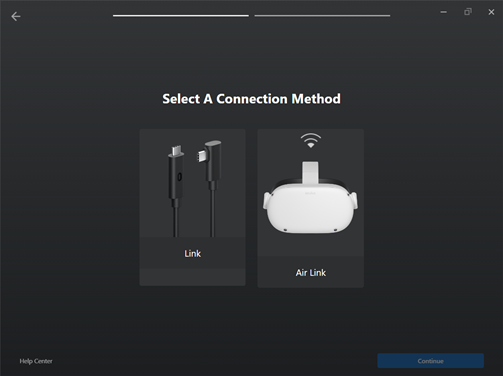
- เลือกวิธีเชื่อมต่อโดยใช้ Link

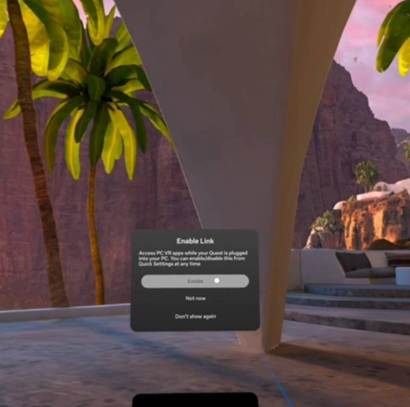
- เมื่อเชื่อม Link แล้วใน Headset จะขึ้นหน้าต่าง Enable Link ให้กดที่ Enable เพื่อเชื่อมกับคอมพิวเตอร์
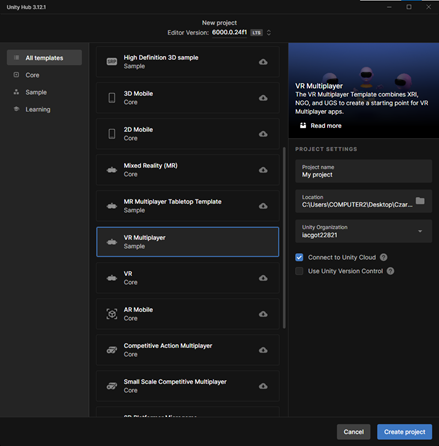
Unity
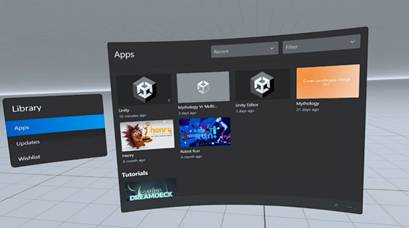
- สร้าง Project Unity แบบ VR Multiplayer
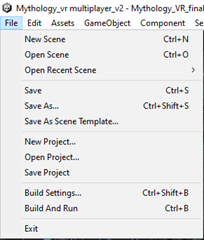
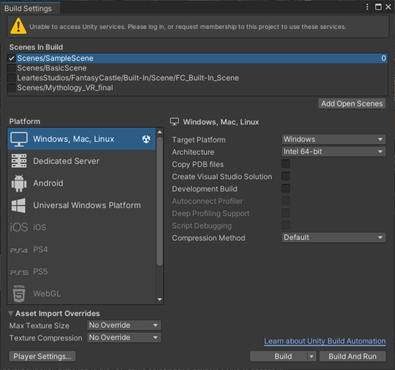
- ไปที่ build Setting เลือก SampleScene เพื่อทดสอบ
การเชื่อมต่อ oculus quest 2 และ HTC Vive
- โหลด Git เพื่อใช้โหลด Plug-in จาก Github

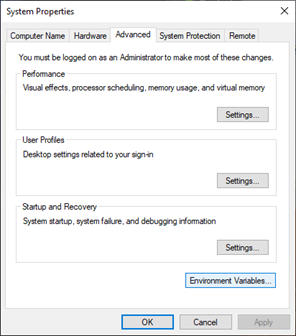
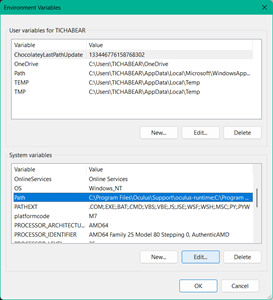
- เข้า System Properties กดที่ Environment Variables
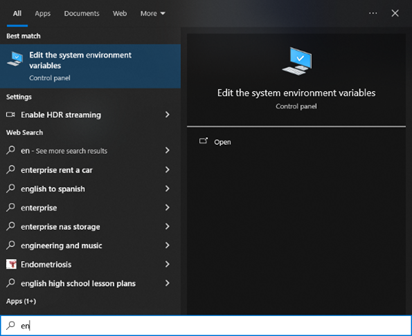
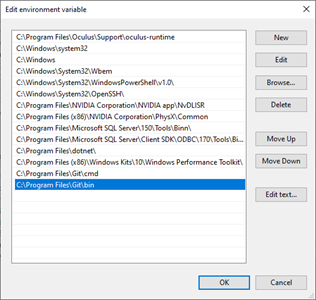
- ดูที่ System Variables เพิ่ม path ของ Git เข้าไป
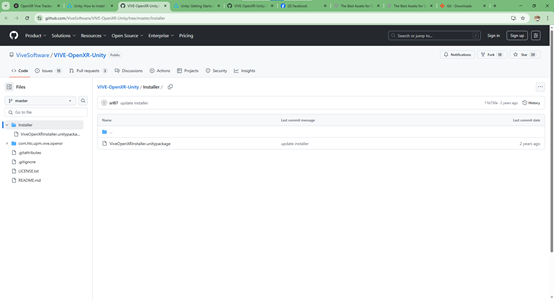
- โหลด Vive OpenXR Plugin จาก Github ของเว็บไซต์ Vive Developers

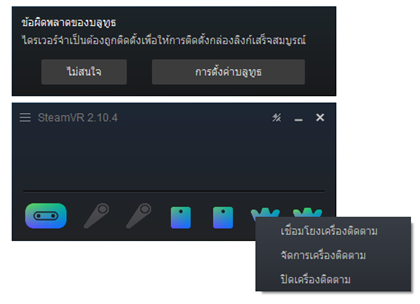
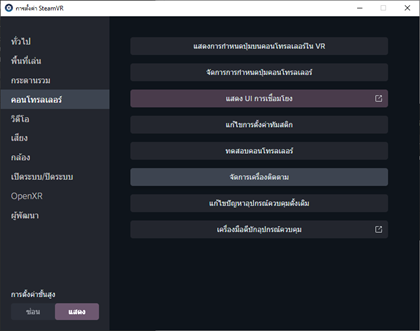
SteamVR
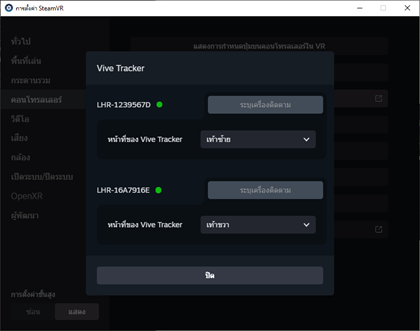
- จัดการตั้งค่าอุปกรณ์ที่ต้องการใช้ว่าให้ติดตามส่วนใหน
Unity
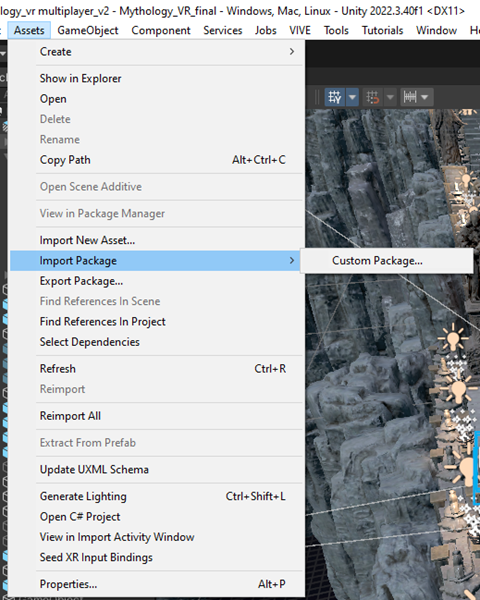
- นำเข้า Package ที่โหลดมา
- เลือก Menu Vive ไปที่ OpenXR Installer และเลือก Install or Update latest version

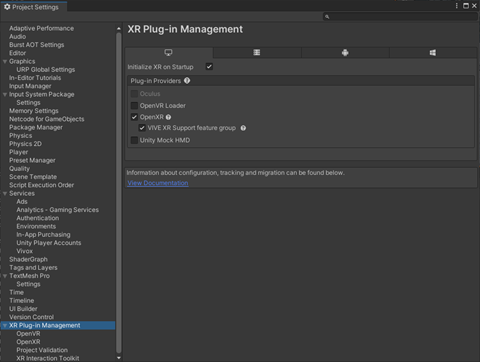
- ไปที่ XR Plug—in Management ใน Project Settiings
- เลือก OpenXR และ Vive XR Support feature group
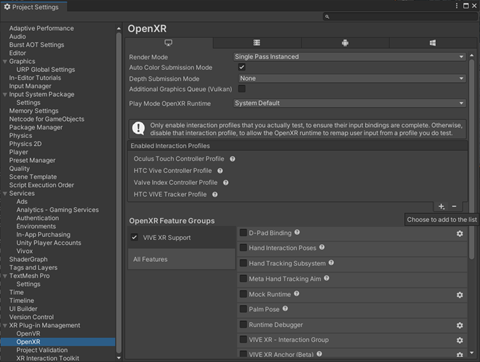
- ไปดูที่ XR Plug-in Management → OpenXR
- ใน Enabled Interaction Profiles เพิ่ม HTC Vive Controller Profile และ HTC Vive Tracker Profile
- ทดสอบการใช้ Vive Tracker เคลื่อนที่ตัวละครแทน handcontroller
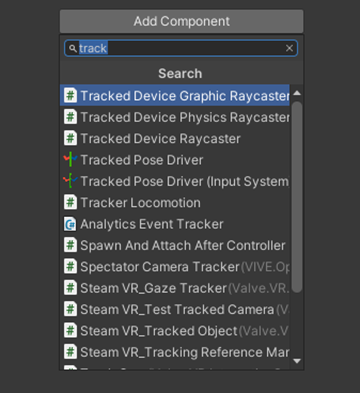
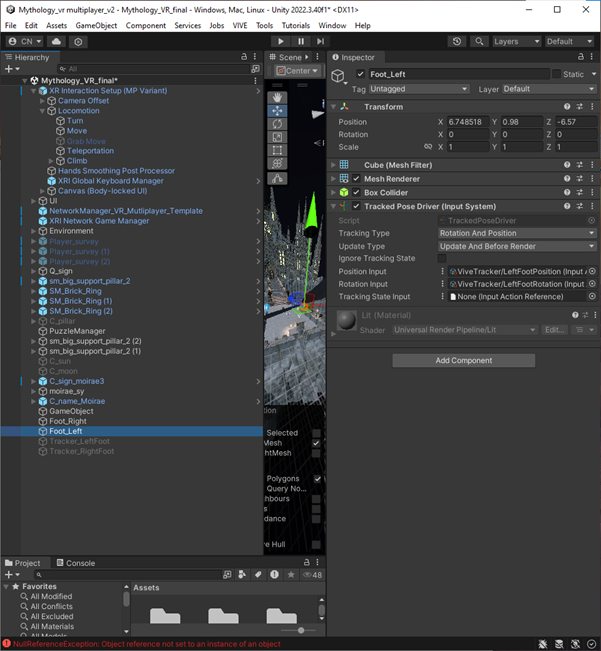
- สร้าง 3D Object เช่น Cube / Model ที่ต้องการเชื่อมกับอุปกรณ์ Vive Tracker

- เพิ่ม Component → Tracked Pose Driver (Input System)
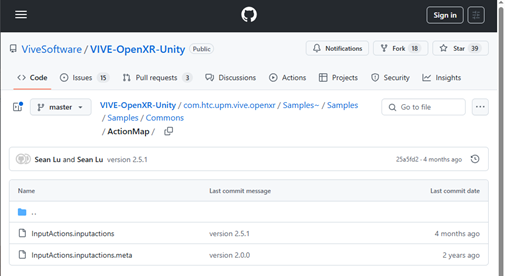
- โหลด ActionMap ใน Github มาใส่ไว้ใน Assets
- Position input / Rotation input เลือกให้เป็น Use Reference
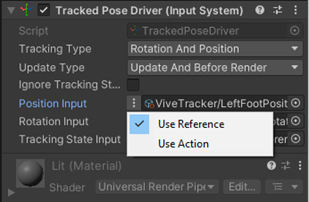
- เลือก Vive Tracker/…Position , Vive Tracker/…Rotation โดยเลือกให้ตรงกับอุปกรณ์ที่ใช้ เช่น ติดตามเท้าซ้ายเลือกเป็น Vive Tracker/LeftFootPosition และ Vive Tracker/ LeftFootRotation
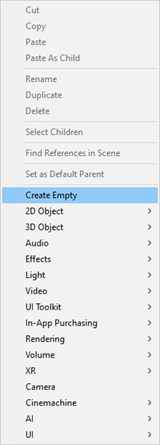
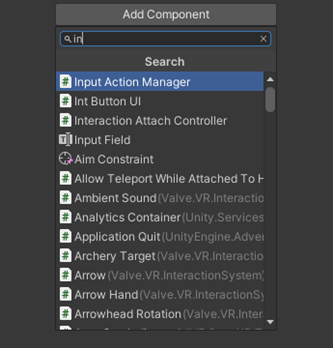
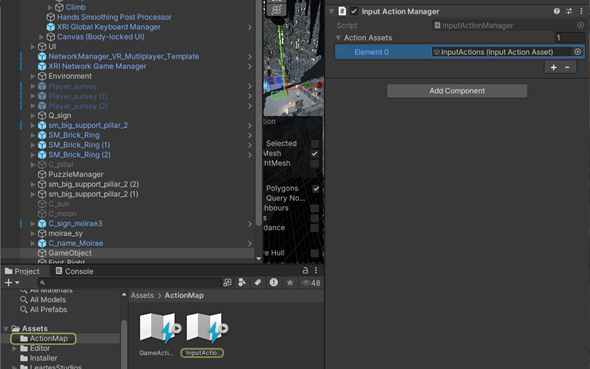
- สร้าง Game Object เพิ่ม Script Input Action Manage
- ใน Action Assets ให้ใส่ InputActions ที่อยู่ใน ActionMap
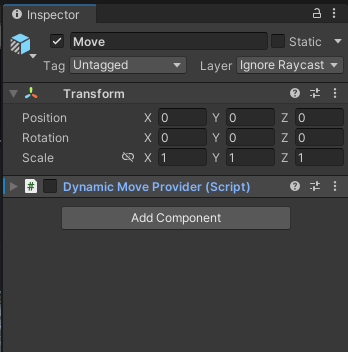
- ไปที่ Hierarchy → Locomotion → Move นำเครื่องหมายถูกออกจาก Script Dynamic Move Provider
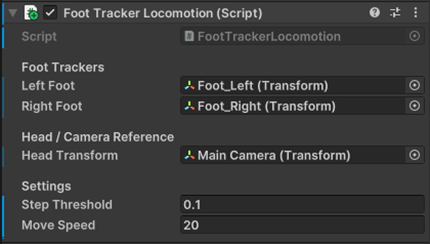
- เพิ่ม Script FootTrackerLocomotion เพื่อบังคับตัวละครผ่าน Vive Tracker
FootTrackerLocomotion.cs
using UnityEngine;

public class FootTrackerLocomotion : MonoBehaviour

{

    [Header("Foot Trackers")]

    public Transform leftFoot;

    public Transform rightFoot;

    [Header("Head / Camera Reference")]

    public Transform headTransform;

    [Header("Settings")]

    public float stepThreshold = 0.1f;  // ความไวในการตรวจจับการก้าว

    public float moveSpeed = 1.0f;      // ความเร็วในการเคลื่อนที่

    private Vector3 lastLeftPos;

    private Vector3 lastRightPos;

    private CharacterController characterController;

    private void Start()

    {

        characterController = GetComponent<CharacterController>();

        if (characterController == null)

        {

            characterController = gameObject.AddComponent<CharacterController>();

        }

        lastLeftPos = leftFoot.position;

        lastRightPos = rightFoot.position;

    }

    private void Update()

    {

        Vector3 leftDelta = leftFoot.position - lastLeftPos;

        Vector3 rightDelta = rightFoot.position - lastRightPos;

        float leftMove = leftDelta.magnitude;

        float rightMove = rightDelta.magnitude;

        bool isLeftStep = leftMove > stepThreshold;

        bool isRightStep = rightMove > stepThreshold;

        // ถ้ามีการก้าวเท้า

        if (isLeftStep || isRightStep)

        {

            Vector3 forwardDirection = headTransform.forward;

            forwardDirection.y = 0f; // ไม่ให้เคลื่อนที่ในแนวตั้ง

            forwardDirection.Normalize();

            Vector3 move = forwardDirection * moveSpeed * Time.deltaTime;

            characterController.Move(move);

        }

        // เก็บตำแหน่งล่าสุด

        lastLeftPos = leftFoot.position;

        lastRightPos = rightFoot.position;

    }

}- เพิ่มสคริป FootTrackerLocomotion เพื่อบังคับตัวละครผ่าน Vive Tracker
- ลาก Vive Tracker ซ้าย/ขวา มาลงช่อง LeftFoot, RightFoot
- ลาก Main Camera ลงใน Head Transform
- ปรับค่า Step Threshold และ Move Speed ตามต้องการ
วิธีการพัฒนาเกม
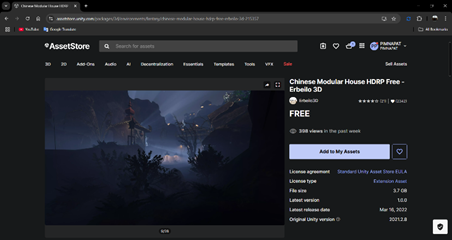
การโหลด Asset จาก Unity Asset Store และเพิ่ม Package ในโปรเจกต์ Unity
- เปิด Unity Asset Store โดยคลิก Window > Asset Store หรือ เปิดผ่านเบราว์เซอร์โดยตรงที่ https://assetstore.unity.com
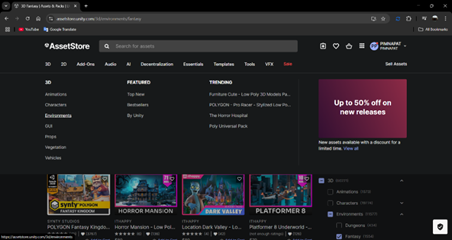
- ค้นหา Asset ที่ต้องการ
- คลิก Add to My Assets (แบบฟรี) หรือ Add to Cart (แบบเสียเงิน) และซื้อให้เรียบร้อย
- ใน Unity Editor คลิก Window > Package Manager
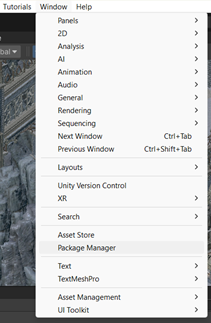
- เลือก My Assets จากนั้น คลิก Asset ที่ต้องการและ กด Download

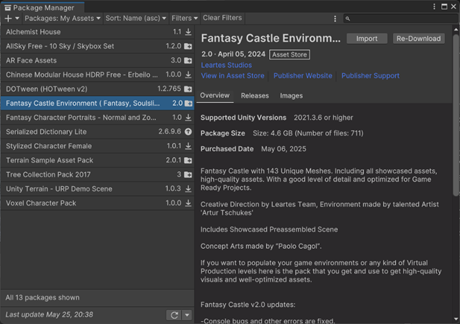
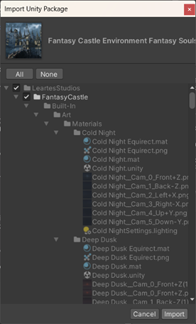
- เมื่อดาวน์โหลดเสร็จ กด Import เพื่อเพิ่มลงในโปรเจกต์ โดยจะมีการแสดงรายการไฟล์ที่จะแทรกลงในโปรเจกต์ให้ตรวจสอบก่อนและคลิก Import อีกครั้ง
สร้างตัวละครที่ควบคุมผ่านเมาส์และคีย์บอร์ดเพื่อใช้ในการทดสอบเล่นเกม
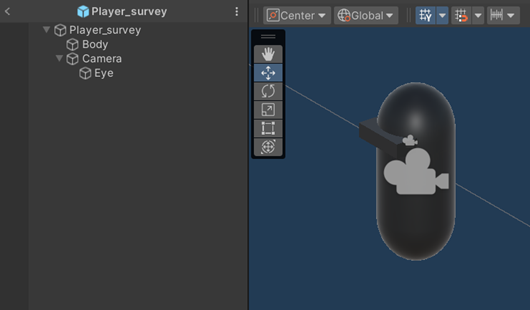
- สร้าง Player_survey : GameObject – Create Empty | Position (0, 0, 0), Rotation (0, 0, 0), Scale (1, 1, 1)
- เพิ่ม Body : GameObject – 3D Object – Capsule | Position (0, 0, 0), Rotation (0, 0, 0), Scale (1, 1.2, 1) ใน Player_survey
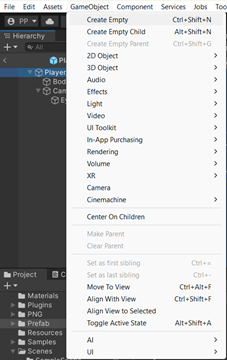
- เพิ่ม Camera: GameObject – Carmera ใน Player_survey
- เพิ่ม Eye: GameObject – 3D Object – Cube | Position (0, 0.6, 0.3), Rotation (0, 0, 0), Scale (0.8, 0.2, 0.6) ใน Camera
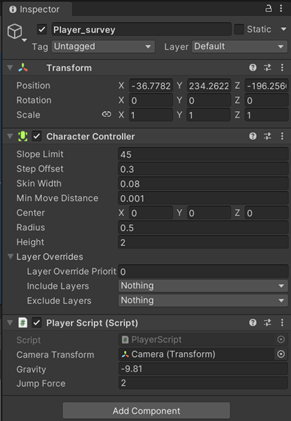
- เพิ่ม Character Controller component ใน Player_survey
- สร้าง C# Script ชื่อ PlayerScript ในโฟลเดอร์ Asset > Script และเพิ่มใน Player_survey โดยลาก Camera มาใส่ใน Camera Transform
PlayerScript.cs
using System.Collections;

using System.Collections.Generic;

using UnityEngine;

public class PlayerScript : MonoBehaviour

{

    CharacterController cc;

    public Transform cameraTransform;

    float pitch = 0f;

    float yVelocity = 0f;

    public float gravity = -9.81f;

    public float jumpForce = 7f;

    void Start()

    {

        cc = GetComponent<CharacterController>();

        Cursor.lockState = CursorLockMode.Locked;

    }

    void Update()

    {

        MovePlayer();

        Look();

    }

    void MovePlayer()

    {

        Vector3 move = new Vector3(Input.GetAxis("Horizontal"), 0, Input.GetAxis("Vertical"));

        move = Vector3.ClampMagnitude(move, 1f);

        move = transform.TransformDirection(move);

        if (cc.isGrounded)

        {

            yVelocity = -1f;

            if (Input.GetButtonDown("Jump")) // ให้ Spacebar เป็นปุ่มกระโดด

            {

                yVelocity = jumpForce;

            }

        }

        else

        {

            yVelocity += gravity * Time.deltaTime;

        }

        move.y = yVelocity;

        cc.Move(move * Time.deltaTime * 5f); // คูณด้วยความเร็วเคลื่อนที่

    }

    void Look()

    {

        float mousex = Input.GetAxis("Mouse X") * 3f;

        transform.Rotate(0, mousex, 0);

        pitch -= Input.GetAxis("Mouse Y") * 3f;

        pitch = Mathf.Clamp(pitch, -45f, 45f);

        cameraTransform.localRotation = Quaternion.Euler(pitch, 0, 0);

    }
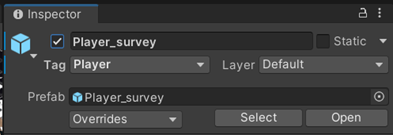
}- ทำให้เป็น Prefab โดยลาก Player_survey จาก Hierarchy มาใส่ในโฟลเดอร์ Asset > Prefab
- เพิ่ม Tag “Player”
ปริศนาเกม
- สร้างป้ายคำอธิบาย
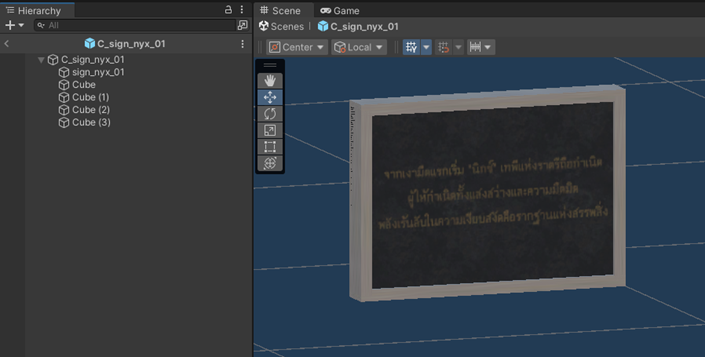
- สร้าง C_sign_x : GameObject – Create Empty | Scale (1, 1, 1)
- เพิ่ม sign_x : GameObject – 3D Object – Cube | Position (0.4, 2, 0), Scale (0.05, 0.4, 0.6) ใน C_sign_x
- เพิ่ม Cube | Position (0.4, 2.2, 0), Scale (0.07, 0.025, 0.6) ใน C_sign_x
- เพิ่ม Cube(1) | Position (0.4, 1.8, 0), Scale (0.07, 0.025, 0.6) ใน C_sign_x
- เพิ่ม Cube(2) | Position (0.4, 2, 0.2875), Scale (0.07, 0.4, 0.025) ใน C_sign_x
- เพิ่ม Cube(3) | Position (0.4, 2, -0.2875), Scale (0.07, 0.4, 0.025) ใน C_sign_x
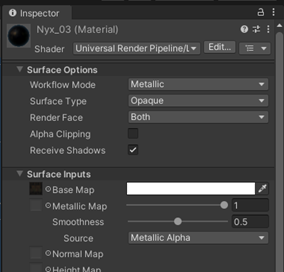
- เพิ่มรูปที่ต้องการลงในโฟลเดอร์ Asset > PNG และลากรูปที่จะใช้มาใส่ใน sing_x
- เลือก Material ที่ปรากฏขึ้นจาก Asset > PNG > Materials และปรับค่า Metallic Map เป็น 1
- เลือก Material ที่ import มาพร้อม packages หรือ สร้าง Material ใหม่มาเพิ่มใน Cube, Cube(1), Cube(2), Cube(3)
- เมื่อสร้างเรียบร้อยแล้วลาก GameObject จาก Hierarchy มาใส่ในโฟลเดอร์ Asset > Prefab
ปริศนาเกมที่ 1 เลือกสัญลักษณ์ให้ถูกต้องเพื่อเปิดเส้นทางสู่เกมถัดไป
- สร้างสัญลักษณ์ที่ใช้ในปริศนา
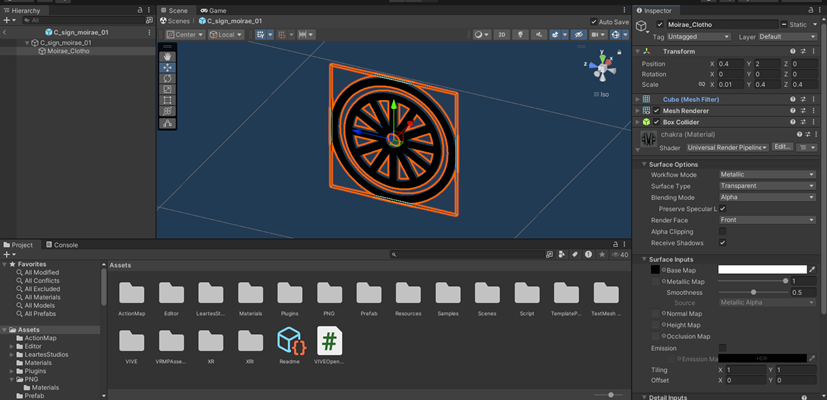
- สร้าง C_sign_moirae_xx : GameObject – Create Empty | Position (0, 0, 0), Scale (1, 1, 1)
- เพิ่ม Moirae_X : GameObject – 3D Object – Cube | Position (0.4, 2, 0), Scale (0.001, 0.4, 0.4) ใน C_sign_moirae_xx
- เพิ่มรูปที่ต้องการลงในโฟลเดอร์ Asset > PNG และลากรูปที่จะใช้มาใส่ใน Moirae_X
- เลือก Material ที่ปรากฏขึ้นจาก Asset > PNG > Materials และปรับ Surface Type > Transparent, ค่า Metallic Map เป็น 1
สร้างกำแพงกั้นระหว่างเกมที่ 1 และ 2
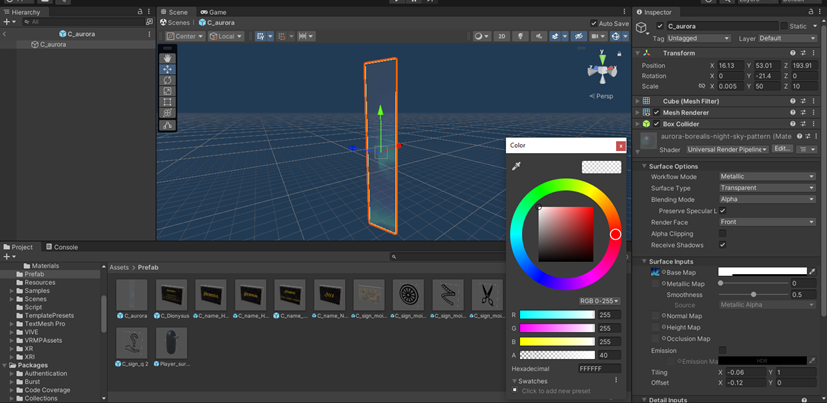
- สร้าง C_aurora : GameObject – 3D Object – Cube | Position (16.10, 53, 194), Rotation (0, -21.4, 0), Scale (0.005, 50, 10)
- เพิ่มรูปที่ต้องการลงในโฟลเดอร์ Asset > PNG และลากรูปที่จะใช้มาใส่ใน C_aurora
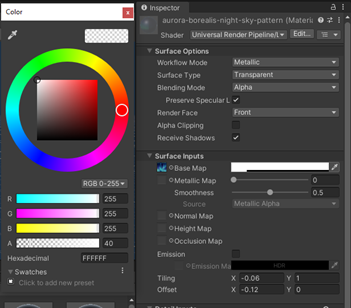
- เลือก Material ที่ปรากฏขึ้นจาก Asset > PNG > Materials และปรับ Surface Type > Transparent, Color (A = 40)
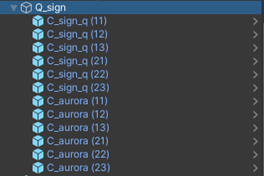
- นำสัญลักษณ์ที่สร้างไว้มาวางในตำแหน่งที่ต้องการ
- เพิ่ม C_sign_q (xx) : GameObject – Create Empty โดยให้สัญลักษณ์เป็น child object ของ C_sign_q (xx)

- ลบสัญลักษณ์ที่เป็น child object ของ C_sign_q (xx) ออก
- สร้าง C# Script ชื่อ MultiSwapObject ในโฟลเดอร์ Asset > Script และเพิ่มใน C_sign_q (xx) โดย
- Prefab To Swap | สัญลักษณ์ (prefab) ที่ต้องการให้เปลี่ยนเมื่อมีการกด spacebar
- Player | Player_survey (ตัวละครที่มี Character Controller และ Camera)
- Trigger Distance | ระยะห่างระหว่างตำแหน่งสัญลักษณ์กับตัวละครที่สามารถกดเปลี่ยนสัญลักษณ์ได้
- Objects To Toggle | C_aurora (xx) – วัตถุที่จะหายไปเมื่อเลือกสัญลักษณ์ได้ถูกต้อง
- Correct Prefab Index | ลำดับของสัญลักษณ์ที่ถูกต้องตาม PrefabToSwap [0, 1, …]
MultiSwapObject.cs
using System.Collections;

using System.Collections.Generic;

using UnityEngine;

public class MultiSwapObject : MonoBehaviour

{

    public GameObject[] prefabsToSwap; // Prefab ทั้งหลาย

    public Transform player;

    public float triggerDistance = 5f;

    public GameObject[] objectsToToggle; // วัตถุอื่นที่ต้องเปิด/ปิด

    public int correctPrefabIndex = 0;

    private int currentIndex = -1;

    private GameObject currentInstance; // เก็บ prefab ปัจจุบันที่สร้างเป็นลูก

    void Start()

    {

        // เริ่มต้นสามารถสร้าง prefab ตัวแรกเลยก็ได้

        SwapObject();

    }

    void Update()

    {

        if (Input.GetKeyDown(KeyCode.R) && IsPlayerInRange())

        {

            SwapObject();

        }

    }

    bool IsPlayerInRange()

    {

        return Vector3.Distance(player.position, transform.position) <= triggerDistance;

    }

    void SwapObject()

    {

        if (prefabsToSwap.Length == 0) return;

        currentIndex = (currentIndex + 1) % prefabsToSwap.Length;

        // ลบวัตถุก่อนหน้า (เฉพาะลูกที่เราสร้างไว้)

        if (currentInstance != null)

        {

            Destroy(currentInstance);

        }

        // สร้างวัตถุใหม่เป็นลูกของ object นี้ และใช้ localPosition = Vector3.zero เพื่ออยู่ในตำแหน่งเดียว

        currentInstance = Instantiate(prefabsToSwap[currentIndex], transform);

        currentInstance.transform.localPosition = Vector3.zero;

        currentInstance.transform.localRotation = Quaternion.identity;

        // เปิด/ปิดวัตถุอื่นตามว่าเลือก prefab ถูกต้องหรือไม่

        bool isCorrect = (currentIndex == correctPrefabIndex);

        foreach (GameObject obj in objectsToToggle)

        {

            if (obj != null)

                obj.SetActive(!isCorrect); // ปิดเมื่อถูก, เปิดเมื่อผิด

        }

    }

}
การเปลี่ยนจาก Player แบบควบคุมด้วยเมาส์/คีย์บอร์ดมาใช้ XR Interaction โดยเปลี่ยน Transform player ให้อ้างอิง XR Origin (หรือ Main Camera) และ เปลี่ยน Input.GetKeyDown(…) ไปใช้ XR Controller โดย
- Xr Head | XR Interaction Setup > Camera Offset > Main Camera
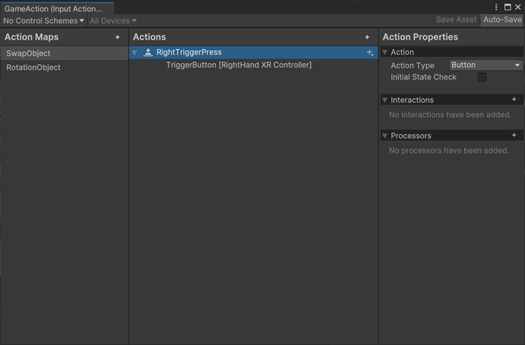
- โฟลเดอร์ Assets > ActionMap สร้าง GameAction : Assets > Create > Input Actions | [Action Maps +] SwapObject, [Actions > Action Properties > Action Type] Button, [Actions > New action (dropdown) ] No Binding, [Binding Properties] Binding > Path > XR Controller > XR Controller (RightHand) > Usages > TriggerButton

- เพิ่ม GameAction ใน Input Action Manager
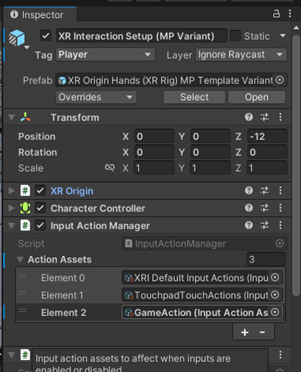
- Swap Action | Input Action ที่ต้องการใช้
MultiSwapObject1.cs
using System.Collections;

using System.Collections.Generic;

using UnityEngine;

using UnityEngine.InputSystem;

public class MultiSwapObject1 : MonoBehaviour

{

    public GameObject[] prefabsToSwap; // Prefab ทั้งหลาย

    public Transform xrHead;

    public float triggerDistance = 5f;

    public GameObject[] objectsToToggle; // วัตถุอื่นที่ต้องเปิด/ปิด

    public int correctPrefabIndex = 0;

    public InputActionProperty swapAction;

    private int currentIndex = -1;

    private GameObject currentInstance; // เก็บ prefab ปัจจุบันที่สร้างเป็นลูก

    private bool correctActive = false;

    void Start()

    {

        // เริ่มต้นสามารถสร้าง prefab ตัวแรกเลยก็ได้

        SwapObject();

    }

    void Update()

    {

        if (swapAction.action.WasPressedThisFrame() && Vector3.Distance(xrHead.position, transform.position) <= triggerDistance)

        {

            SwapObject();

        }

    }

    // bool IsPlayerInRange()

    // {

    //     return Vector3.Distance(player.position, transform.position) <= triggerDistance;

    // }

    void SwapObject()

    {

        if (prefabsToSwap.Length == 0) return;

        currentIndex = (currentIndex + 1) % prefabsToSwap.Length;

        // ลบวัตถุก่อนหน้า (เฉพาะลูกที่เราสร้างไว้)

        if (currentInstance != null)

        {

            Destroy(currentInstance);

        }

        // สร้างวัตถุใหม่เป็นลูกของ object นี้ และใช้ localPosition = Vector3.zero เพื่ออยู่ในตำแหน่งเดียว

        currentInstance = Instantiate(prefabsToSwap[currentIndex], transform);

        currentInstance.transform.localPosition = Vector3.zero;

        currentInstance.transform.localRotation = Quaternion.identity;

        // เปิด/ปิดวัตถุอื่นตามว่าเลือก prefab ถูกต้องหรือไม่

        bool isCorrect = (currentIndex == correctPrefabIndex);

        foreach (GameObject obj in objectsToToggle)

        {

            if (obj != null)

                obj.SetActive(!isCorrect); // ปิดเมื่อถูก, เปิดเมื่อผิด

        }

    }

}
ปริศนาเกมที่ 2 เลื่อนเทวรูปให้อยู่ในตำแหน่งที่กำหนดและหมุนให้เทวรูปหันไปในทิศที่กำหนด

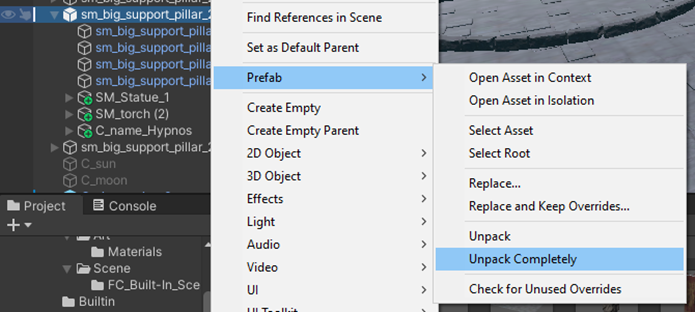
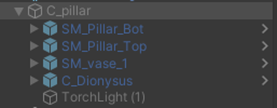
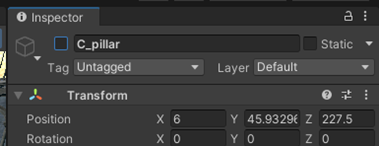
- นำ Prefab ที่อยู่ใน Assets ที่โหลดเข้ามามาประกอบส่วนของ ฐาน เทวรูป ป้าย และ คบเพลิง เข้าด้วยกันโดยมีฐานเป็น parent object จากนั้นคลิกขวา > Prefab > Unpack Completely
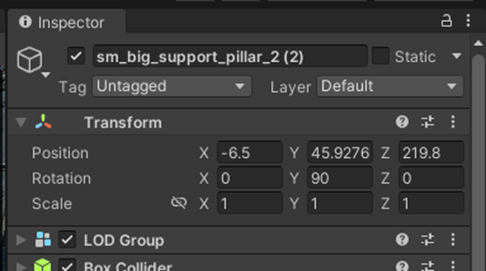
- นำ static ใน Inspector ของวัตถุที่ต้องการให้เลื่อนได้ออก
- วาง Prefab ที่ใช้เป็นจุดบอกตำแหน่งวางในตำแหน่งที่ต้องการ โดยที่ Prefab นี้ต้องไม่มี Collider
- สร้าง GameObject ที่จะให้ปรากฏเมื่อทำตามเงื่อนสำเร็จจาก Prefab ที่อยู่ใน Assets และปิดไว้
- สร้าง C# Script ชื่อ CheckRotationAndPosition ในโฟลเดอร์ Asset > Script และเพิ่มใน Object ที่ต้องการให้เลื่อน โดย
- Player | Player_survey (ตัวละครที่มี Character Controller และ Camera)
- Trigger Distance | ระยะห่างที่สามารถกดให้หมุนได้
- Move Distance | ระยะที่ทำให้เกิดการเลื่อน
- Push Cooldown | ระยะหน่วงเวลาระหว่างการเลื่อนแต่ละครั้ง
- Traget Position | วัตถุที่ใช้เป็นตัวกำหนดตำแหน่ง
- Rotation Step | องศาการหมุนในแต่ละครั้ง
- Correct Rotation Y | องศาการหมุนที่ถูกต้อง
- Puzzle Manager | ตัวควบคุมการแสดงวัตถุที่ถูกปิดไว้ เมื่อตรงตามเงื่อนไขที่กำหนด
CheckRotationAndPosition.cs
using System.Collections;

using System.Collections.Generic;

using UnityEngine;

public class CheckRotationAndPosition : MonoBehaviour

{

    public Transform player;

    public float triggerDistance = 8f;

    public float moveDistance = 3f;

    public float pushCooldown = 0.5f;

    public Transform targetPosition;

    public float rotationStep = 90f;

    public int correctRotationY = 0;

    public PuzzleManager puzzleManager;

    private float lastPushTime = -5f;

    private bool isCorrect = false;

    void Update()

    {

        // หมุนวัตถุเมื่อใกล้และกด R

        if (Input.GetKeyDown(KeyCode.R) && Vector3.Distance(player.position, transform.position) <= triggerDistance)

        {

            transform.Rotate(0, rotationStep, 0);

            CheckState();

        }

        // ตรวจว่าผู้เล่นเข้าใกล้ทิศไหน

        if (Time.time - lastPushTime > pushCooldown)

        {

            Vector3 toPlayer = player.position - transform.position;

            toPlayer.y = 0;

            if (toPlayer.magnitude <= moveDistance)

            {

                Vector3 moveDir = Vector3.zero;

                if (Mathf.Abs(toPlayer.x) > Mathf.Abs(toPlayer.z))

                    moveDir = new Vector3(-Mathf.Sign(toPlayer.x), 0, 0);

                else

                    moveDir = new Vector3(0, 0, -Mathf.Sign(toPlayer.z));

                Vector3 newPos = transform.position + moveDir * moveDistance;

                Debug.Log($"[MOVE] จาก {transform.position} → {newPos}");

                transform.position = newPos;

                lastPushTime = Time.time;

            }

        }

    }

    void CheckState()

    {

        // สร้างตำแหน่ง 2D บนระนาบพื้น (X,Z) เท่านั้น

        Vector2 currentXZ = new Vector2(transform.position.x, transform.position.z);

        Vector2 targetXZ = new Vector2(targetPosition.position.x, targetPosition.position.z);

        // ตรวจสอบระยะห่างเฉพาะบนระนาบ XZ

        bool positionOK = Vector2.Distance(currentXZ, targetXZ) < 6f;

        // ตรวจหมุนเฉพาะ Y

        float currentY = Mathf.Round(transform.eulerAngles.y % 360f);

        float correctY = Mathf.Round(correctRotationY % 360f);

        bool rotationOK = Mathf.Abs(Mathf.DeltaAngle(currentY, correctY)) < 5f;

        bool newIsCorrect = positionOK && rotationOK;

        if (newIsCorrect != isCorrect)

        {

            isCorrect = newIsCorrect;

            Debug.Log("ตำแหน่ง XZ ถูกต้อง: " + positionOK + " | หมุนถูกต้อง: " + rotationOK);

            puzzleManager.UpdateStatus(isCorrect);

        }

    }

    void FixedUpdate()

    {

        Debug.DrawLine(transform.position, targetPosition.position, Color.green);

        CheckState();

    }

}- สร้าง PuzzleManager : GameObject – Create Empty | Scale (1, 1, 1)
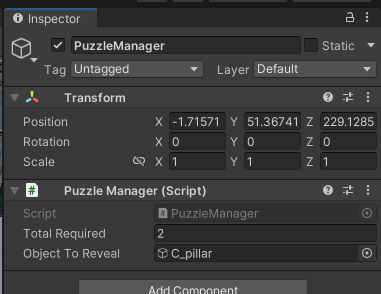
- สร้าง C# Script ชื่อ CheckRotationAndPosition ในโฟลเดอร์ Asset > Script และเพิ่มใน PuzzleManager โดย
- Total Required | จำนวนวัตถุที่ต้องตรวจสอบ
- Object To Reveal | Object ที่ต้องการให้แสดง (GameObject ที่ปิดไว้)
PuzzleManager.cs
using System.Collections;

using System.Collections.Generic;

using UnityEngine;

public class PuzzleManager : MonoBehaviour

{

    public int totalRequired = 3;

    public GameObject objectToReveal;

    private int currentCorrect = 0;

    public void UpdateStatus(bool added)

    {

        currentCorrect += added ? 1 : -1;

        currentCorrect = Mathf.Clamp(currentCorrect, 0, totalRequired);

        if (currentCorrect >= totalRequired)

        {

            objectToReveal.SetActive(true);

        }

        else

        {

            objectToReveal.SetActive(false);

        }

    }

}- การเปลี่ยนจาก Player แบบควบคุมด้วยเมาส์/คีย์บอร์ดมาใช้ XR Interaction โดยเปลี่ยน Transform player ให้อ้างอิง XR Origin (หรือ Main Camera) และ เปลี่ยน Input.GetKeyDown(…) ไปใช้ XR Controller โดย
- Xr Head | XR Interaction Setup > Camera Offset > Main Camera
- Rotate Action | Input Action ที่ต้องการใช้
CheckRotationAndPosition1.cs
using System.Collections;

using System.Collections.Generic;

using UnityEngine;

using UnityEngine.InputSystem;

public class CheckRotationAndPosition1 : MonoBehaviour

{

    public InputActionProperty rotateAction;

    public Transform xrHead;

    public float triggerDistance = 8f;

    public float moveDistance = 3f;

    public float pushCooldown = 0.5f;

    public Transform targetPosition;

    public float rotationStep = 90f;

    public int correctRotationY = 0;

    public PuzzleManager puzzleManager;

    private float lastPushTime = -5f;

    private bool isCorrect = false;

    void Update()

    {

        // หมุนวัตถุเมื่อใกล้

        if (rotateAction.action.WasPressedThisFrame())

        {

            Debug.Log("✅ ปุ่มหมุนบน controller ถูกกด");

            if (Vector3.Distance(xrHead.position, transform.position) <= triggerDistance)

            {

                transform.Rotate(0, rotationStep, 0);

                CheckState();

            }

        }

        // ตรวจว่าผู้เล่นเข้าใกล้ทิศไหน

        if (Time.time - lastPushTime > pushCooldown)

        {

            Vector3 toPlayer = xrHead.position - transform.position;

            toPlayer.y = 0;

            if (toPlayer.magnitude <= moveDistance)

            {

                Vector3 moveDir = Vector3.zero;

                if (Mathf.Abs(toPlayer.x) > Mathf.Abs(toPlayer.z))

                    moveDir = new Vector3(-Mathf.Sign(toPlayer.x), 0, 0);

                else

                    moveDir = new Vector3(0, 0, -Mathf.Sign(toPlayer.z));

                Vector3 newPos = transform.position + moveDir * moveDistance;

                Debug.Log($"[MOVE] จาก {transform.position} → {newPos}");

                transform.position = newPos;

                lastPushTime = Time.time;

            }

        }

    }

    void CheckState()

    {

        // สร้างตำแหน่ง 2D บนระนาบพื้น (X,Z) เท่านั้น

        Vector2 currentXZ = new Vector2(transform.position.x, transform.position.z);

        Vector2 targetXZ = new Vector2(targetPosition.position.x, targetPosition.position.z);

        // ตรวจสอบระยะห่างเฉพาะบนระนาบ XZ

        bool positionOK = Vector2.Distance(currentXZ, targetXZ) < 6f;

        // ตรวจหมุนเฉพาะ Y

        float currentY = Mathf.Round(transform.eulerAngles.y % 360f);

        float correctY = Mathf.Round(correctRotationY % 360f);

        bool rotationOK = Mathf.Abs(Mathf.DeltaAngle(currentY, correctY)) < 5f;

        bool newIsCorrect = positionOK && rotationOK;

        if (newIsCorrect != isCorrect)

        {

            isCorrect = newIsCorrect;

            Debug.Log("ตำแหน่ง XZ ถูกต้อง: " + positionOK + " | หมุนถูกต้อง: " + rotationOK);

            puzzleManager.UpdateStatus(isCorrect);

        }

    }

    void FixedUpdate()

    {

        Debug.DrawLine(transform.position, targetPosition.position, Color.green);

        CheckState();

    }

}
ผลตอบรับของผู้เล่น
1. การเดินรู้สึกแปลกๆ เหมือนจะเคลื่อนที่ตลอดเวลา / ลอย เมื่อยกขาข้างหนึ่ง แนะนำว่า ต่อการยกเท้าหนึ่งครั้ง ให้บังคับระยะที่เคลื่อนที่ไปที่มากที่สุดได้ไว้เลย
2. หน้าชนกับบันไดขณะขึ้น แนะนำให้ยกกล้องขึ้นอีกหน่อย
3. การหมุนของรูปปั้นไม่ได้ Origin หมุนจากตรงกลาง ทำให้สับสนเมื่อกดหมุน แนะนำให้ย้ายจุด origin การหมุนไปไว้ตรงกลาง
สิ่งที่ได้เรียนรู้
- การเชื่อมต่ออุปกรณ์สำหรับใช้งาน oculus quest 2 และ HTC Vive
- การใช้งาน oculus quest 2 ร่วมกับ Unity
- การตั้งค่าการใช้งาน controller เช่น การใช้งานปุ่ม trigger/primary บน controller ของ oculus quest 2 ผ่าน VR
ปัญหาที่พบ
- สเปคคอมพิวเตอร์ไม่สามารถต่อกับ oculus quest 2 ได้ แก้ปัญหาโดยพัฒนาเกมให้เล่นได้ทั้งแบบ VR player และ PC player โดยทดสอบระบบ VR กับคอมพิวเตอร์ของมหาวิทยาลัย และใช้ระบบ PC ในการทดสอบการทำงานของเกมขณะพัฒนาระบบ
- ยังไม่สามารถใช้ Meta Quest 2 ร่วมกับ Vive Tracker ได้ แก้ไขปัญหาโดยพัฒนาเกมให้เล่นได้ทั้ง Meta Quest 2 ที่ใช้ touchcontroller ในการบังคับให้ตัวละครเคลื่อนที่ และ HTC Vive Pro ที่สามารถใช้ Vive Tracker ในการบังคับให้ตัวละครเคลื่อนที่
- ไม่สามารถใช้ HTC Vive ธรรมดาได้
การพัฒนาต่อในอนาคต
- ทำระบบให้ผู้เล่นสามารถเลือกระบบในการเล่นเกมได้เอง (VR/PC)
- เพิ่มคำอธิบายและลูกเล่นให้กับเกม เช่น การคลิกที่รูปปั้นแล้วมีคำอธิบายเกี่ยวกับตำนานต่าง ๆ
- ทำระบบให้ผู้เล่นสามารถเล่นได้หลายคน
รายชื่อสมาชิกและหน้าที่ที่รับผิดชอบ
| ชื่อ – นามสกุล | ความรับผิดชอบในทีม |
|---|---|
| น.ส.พิมพ์ณภัทร ปูอินต๊ะ | วิธีการพัฒนาเกม |
| น.ส.ชนัญญ์ทิชา โพธิ์พันธ์ | วิธีการเชื่อมต่อและใช้งานอุปกรณ์ |